
Preparing for a Roof Replacement: Your Complete Homeowner Checklist
Date Posted:
December 16, 2025
Author:
Daryl Gentry
Roof replacement is a significant home investment requiring careful preparation to ensure smooth execution and long-term protection. Proper planning prevents stress, damage, and costly mistakes during installation.
Roof replacement preparation helps homeowners protect their property, avoid installation problems, and ensure long-term roof performance.
Beyond the obvious yard cleanup and attic protection, smart preparation addresses hidden impacts that only surface once the work begins—vibrations that affect delicate electronics, fine dust that infiltrates HVAC systems, and roofing nails designed with barbs that make them nearly invisible in landscaping.
Roof age directly influences roof replacement timing, and homeowners can better plan their project by reviewing how often you should replace your roof in Northeast Ohio before scheduling installation.
Key Takeaways
- Roof replacement preparation protects your home, landscaping, and interior belongings from damage during installation.
- Roof age determines replacement timing, making early planning essential for Northeast Ohio homeowners.
- Qualified roofing contractors deliver longer roof lifespans through proper installation, certification, and warranties.
- Interior and exterior preparation reduces cleanup time, repair costs, and post-installation frustration.
- Clear communication with your contractor prevents delays, misunderstandings, and unexpected disruptions during the project.
Know Your Roof's Age and Timeline
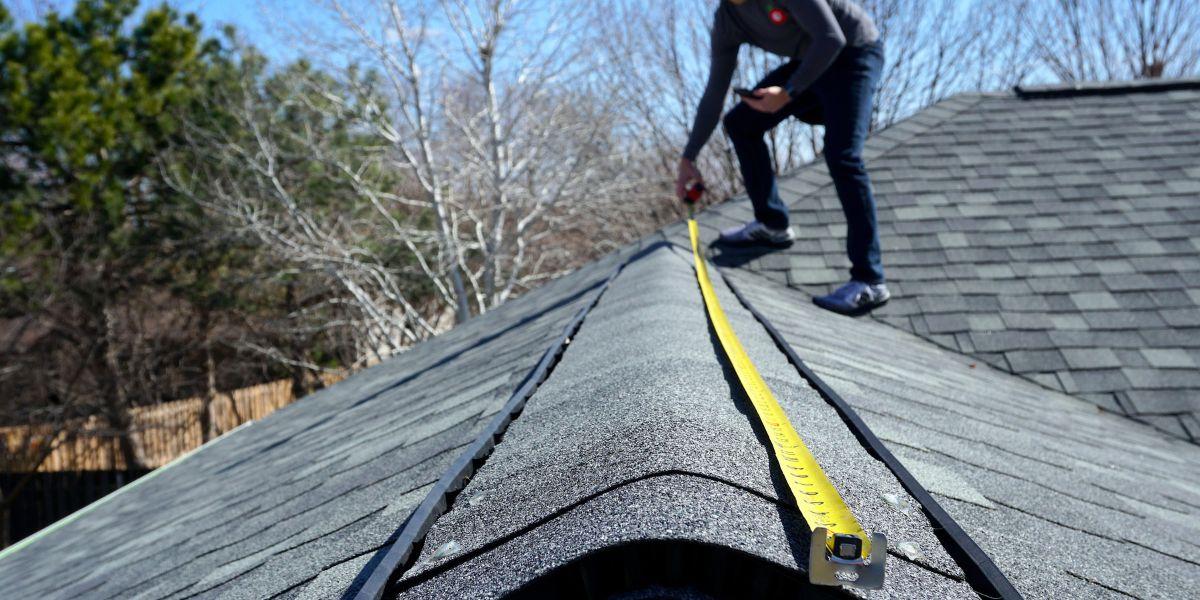
According to InterNACHI's Standard Estimated Life Expectancy Chart, architectural asphalt shingles last 20-30 years, while three-tab shingles last 15-20 years. Northeast Ohio's freeze-thaw cycles and heavy snow compress these timelines at the shorter end. Start replacement planning at year 15 to avoid emergency decisions.
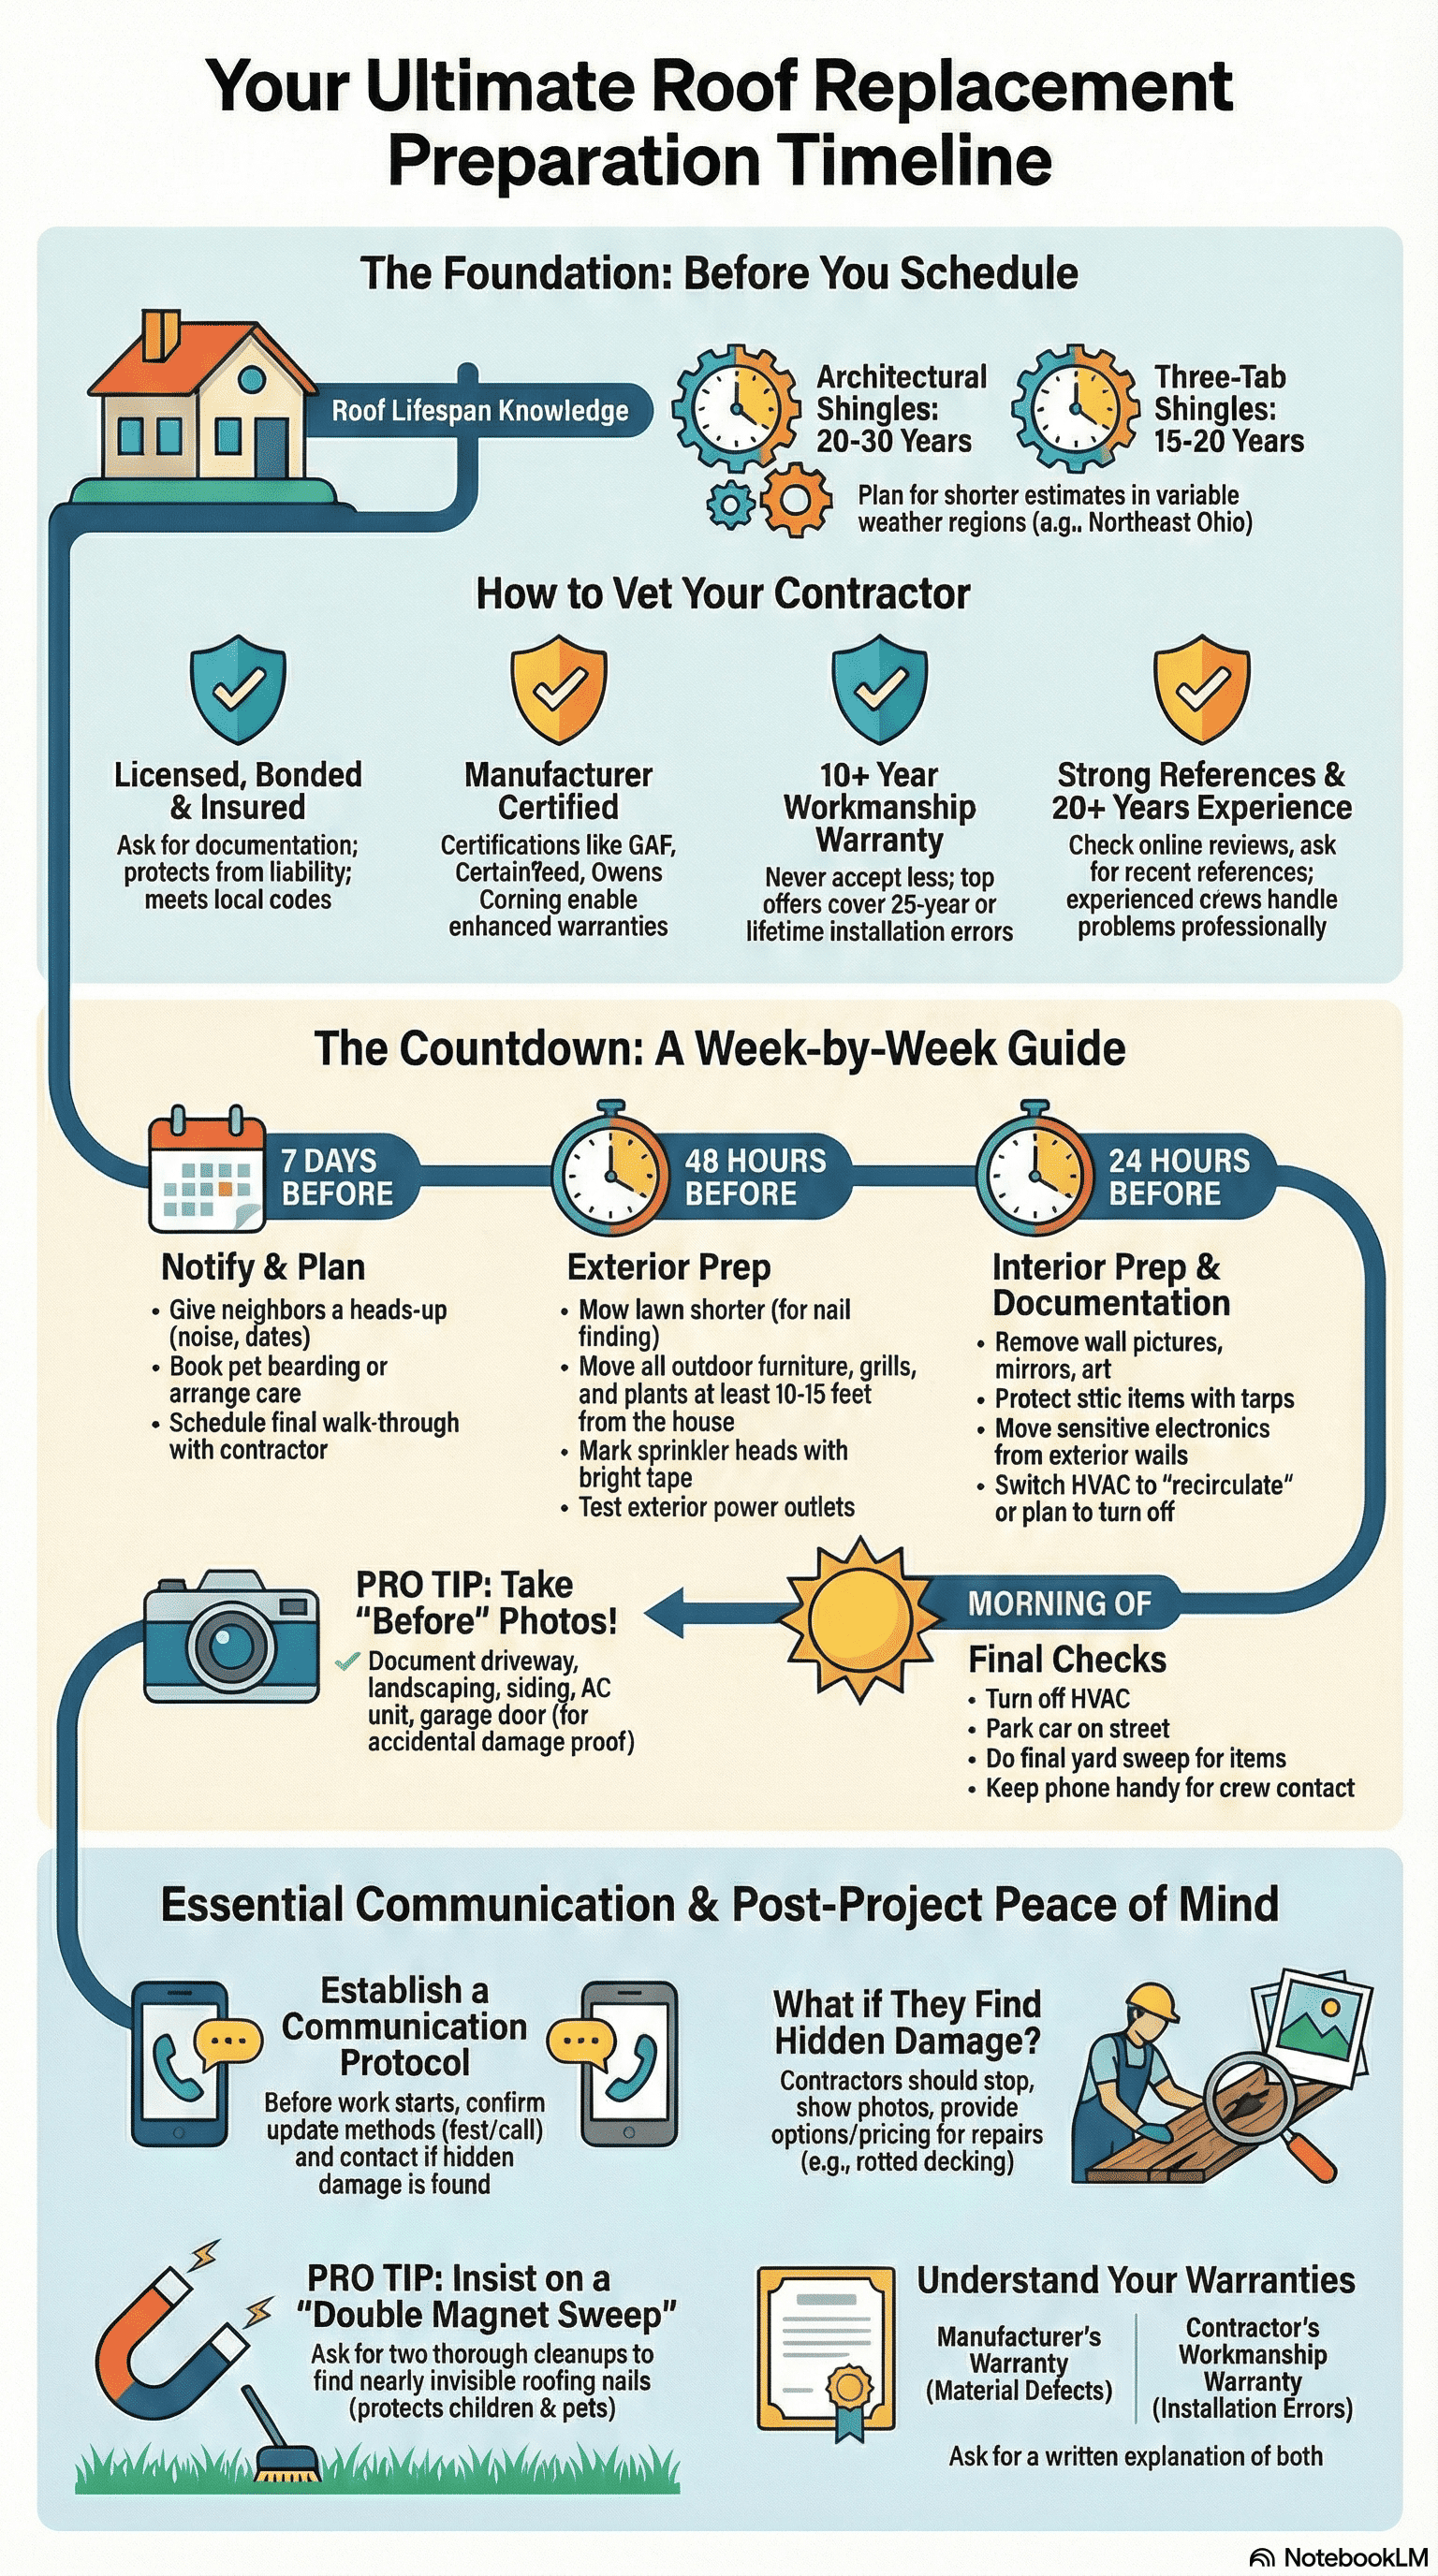
Choose the Right Roofing Contractor
Installation quality determines whether your roof reaches full lifespan or fails prematurely. When evaluating contractors in Akron, Canton, and Massillon, verify these essential credentials:
Licensed, Bonded, Insured. Ask for documentation before signing. This protects you from liability and ensures contractor compliance with building codes.
Manufacturer Certified. GAF Certified Plus, CertainTeed Select ShingleMaster, and Owens Corning certifications enable enhanced warranties uncertified roofers cannot offer. Certification ensures compliance with manufacturer specifications.
10+ Year Workmanship Warranty. Never accept less. Better contractors offer 25-year or lifetime warranties covering installation errors, improper nailing, and flashing mistakes.
Strong References. Request three recent project references. Call homeowners and ask about timeliness, cleanup quality, and contractor responsiveness. Check Google, BirdEye, and Better Business Bureau reviews for satisfaction patterns.
20+ Years Experience. Experienced contractors have solved unexpected problems and trained crews to handle complications professionally.
Contact us now for your free estimate.
Protect Your Home's Interior
Roof replacement vibrations can knock hanging items from walls and shake attic items to floors. Taking interior precautions prevents broken valuables and reduces cleanup costs afterward.
Remove Wall Decorations
Remove pictures, mirrors, artwork, and framed photos from walls—especially upper floors directly below your attic. Hammering and nail gun impacts transmit vibrations throughout your home's frame. Check ceiling-mounted light fixtures and chandeliers on the top floor—these vibrate more intensely than you'd expect and can fall or develop loose connections.
Protect Sensitive Electronics
Desktop computers, home theater systems, and other electronics positioned near exterior walls can rattle and suffer internal component damage from vibrations. Move sensitive equipment away from external walls or power down systems during installation to prevent damage.
Protect Your Attic
Cover stored items, boxes, and insulation with old sheets, drop cloths, or heavy tarps. Place a drop cloth on your attic floor to catch falling particles. This step prevents hours of post-project cleaning.
Manage HVAC Dust Infiltration
The tear-off process creates fine silt that travels through your home's HVAC system. Ask your HVAC company or refer to your system manual about switching to "recirculate" mode during roof installation. Alternatively, turn off your system during work hours to prevent roof dust from being pulled into your ductwork and air filters.
Secure Garage Areas
Keep your garage door closed throughout the project to minimize dust infiltration. If roofers need access to interior power outlets, designate a specific room and close interior doors to other areas.
Prepare Your Property's Exterior
Your yard becomes a construction zone for several days with debris falling and equipment positioned near your foundation. Strategic exterior planning prevents damaged landscaping and personal property loss.
Clear Driveway and Vehicles
Park vehicles on the street or off-site. Contractors need driveway space for dump trucks, material delivery, and crew vehicles. Close your garage door to minimize debris entry. In Northeast Ohio, where many driveways are concrete or asphalt, ask your contractor to place plywood under the dumpster wheels to prevent weight cracks—a dumpster loaded with old shingles can weigh 5-10 tons and damage your driveway permanently if placed directly on concrete or asphalt.
Inspect Siding and Windows with Your Contractor.
Northeast Ohio homes often feature vinyl siding or older windows that are vulnerable to accidental damage during ladder placement and material removal. Walk the property with your contractor before work begins to identify siding panels and window screens that need extra protection. This conversation prevents "Who broke this?" arguments later and ensures your contractor takes appropriate precautions.
Create Work Perimeter
Move outdoor furniture, grills, potted plants, toys, and decorations at least 10-15 feet from your foundation. Roofing nails are designed with barbs or rings that make them nearly invisible in flower beds and landscaping—they're engineered to grip shingles, but this same design makes them hard to detect during cleanup. Remove wind chimes, hanging plants, and flags that could be damaged. Mark any ground-level obstacles (step lights, landscaping borders, deck stairs) with bright orange tape so the crew doesn't trip.
Prepare Landscaping
Cut grass 1-2 days before work begins—short grass makes debris visibility easier and allows cleanup crews to spot barbed roofing nails more thoroughly. Mark sprinkler heads with bright orange tape. Trim overhanging tree branches and discuss landscaping protection with your contractor—many use tarps to protect flower beds and shrubs during the project.
Notify Neighbors
Roof replacement generates significant noise for 1-3 days. A brief conversation with neighbors manages expectations and demonstrates professionalism. Ask if they'll allow roofers to retrieve any stray shingles that blow into their yard—this neighborly approach prevents tension and shows respect for the community.
Manage Family and Pet Safety
Roof installation noise and activity stress family members and pets. Planning appropriate arrangements prevents anxiety and keeps everyone safe.
Pets Need Care
Dogs and cats find roof installation extremely stressful. Hammering and nail gun fire trigger anxiety even in calm animals. Board pets with family or facilities during work days. If boarding isn't possible, keep pets indoors in a quiet room away from work areas.
Children Require Supervision
Young children cannot safely navigate a construction site filled with equipment, nails, and ladders. Arrange childcare or planned outings during work hours. If you work from home, plan to work remotely elsewhere during installation.
Establish Clear Communication with Your Contractor
Clear communication with your contractor before work begins prevents confusion, protects your property, and ensures a smooth project. Setting expectations upfront gives you control over your home and eliminates awkward conversations during active work.
Access and Facilities
Ask your contractor where crew members can use the bathroom. Many homeowners worry about strangers in their home—clarifying this in advance gives you control and eliminates awkward conversations. Ask if they need access to outdoor water for cleanup or if they bring their own supply.
Parking and Access Zone
Designate a specific parking zone for crew trucks and equipment. Establish a "No-Go" zone to ensure you're not blocked in if you need to leave for an emergency. This conversation prevents frustration when a truck parks in front of your garage at 7:00 AM.
Power and Water Access
Test your exterior GFCI outlets the night before work begins so your contractor knows exactly where safe power is available. Confirm the location of your water shutoff, electrical panel, and gas shutoff in case the crew encounters unexpected issues. Ask whether they prefer running extension cords or having direct access to outdoor outlets.
Communication Protocol
Confirm how the crew will contact you if they find unexpected damage, discover existing issues, or need to adjust the timeline due to weather. Exchange phone numbers and clarify whether texting, calling, or in-person conversation is preferred for updates.
Your Roof Replacement Timeline: Preparation by the Numbers
Chronological preparation helps homeowners organize tasks by urgency and importance. Following a day-by-day structure ensures nothing gets overlooked and reduces last-minute stress.
7 Days Before Installation Begins
Notify Your Neighborhood
Contact neighbors to give them advance notice about project dates, expected noise, and rough timeline. Ask about yard access for stray shingles.
Book Pet Boarding
Reserve a spot at a boarding facility or arrange pet care with family. Don't wait until the day before—facilities book up quickly during contractor season.
Schedule Your Contractor Walk-Through
Meet with your contractor's project manager to discuss protection areas, debris containment, access points, and timeline. Ask when work begins, how many days it will take, when cleanup happens, and what to do if weather delays work.
48 Hours Before Work
Monitor the Northeast Ohio Forecast. Check your local weather forecast and call your project manager if there's a greater than 30% chance of rain. Professional crews prioritize a dry "tear-off" window to protect your home's exposed decking from moisture infiltration. Ask your contractor about their rain contingency plan and whether they reschedule or use protective tarping if unexpected showers occur.
Check for Ice Dam and Winter Damage Signs
Before the crew arrives, inspect your roof and gutters for signs of past ice dams or winter damage—missing shingles, damaged flashing, ice dam staining, or water intrusion marks. Point these out to your contractor during the walk-through so they can assess whether additional repairs are needed during the replacement.
Mow Your Lawn
Cut your grass short (shorter than usual) so cleanup crews can see and collect roofing nails, shingle fragments, and metal debris more effectively. Short grass prevents nails and barbs from being hidden in tall growth.
Move Outdoor Items
Relocate patio furniture, grills, potted plants, toys, and yard decorations at least 10-15 feet from your foundation. Place them in a garage, shed, or corner of the yard away from falling debris.
Mark Landscaping Hazards
Mark sprinkler heads with bright orange tape. Place flags near ground-level obstacles (step lights, deck stairs, landscape borders) so the crew doesn't trip.
Trim Tree Branches
Cut back any branches overhanging your roof or work areas. Discuss with your contractor which additional branches might need protection with tarps.
Test Exterior Power Outlets
Check that all exterior GFCI outlets work properly. The crew needs confirmed power access before they arrive—late discovery means your contractor starting late or running extension cords through your home.
24 Hours Before Work
Remove Interior Wall Decorations
Take down pictures, mirrors, artwork, and framed photos from walls. Check ceiling fixtures and chandeliers, especially on the top floor—these vibrate more intensely than ground-level items.
Move Sensitive Electronics
Relocate desktop computers, home theater systems, and other electronics away from exterior walls or power them down during installation.
Protect Your Attic
Cover stored items, boxes, and insulation with old sheets, drop cloths, or heavy tarps. Place a drop cloth on your attic floor to catch falling particles.
Document Your Property
Photograph your driveway, exterior, landscaping, siding, and windows. Take photos of any existing damage. These "before" photos protect you if the crew causes accidental damage—they provide clear documentation of responsibility. Specifically photograph your AC condenser unit and garage door, as these are the most common areas for accidental debris strikes during roof work. Take wide shots and close-ups of these expensive exterior elements so you have clear documentation if damage occurs.
Check Your HVAC System
Switch your system to "recirculate" mode or plan to turn it off during work hours to prevent roof dust from infiltrating your ductwork and filters.
Confirm Parking and Access
Park your vehicle on the street or off-site. Confirm with your contractor where crew vehicles should park and establish a clear "No-Go" zone to ensure you can leave if needed.
Morning of Installation
Turn Off HVAC
If you haven't already, switch to recirculate or turn off your system to prevent roof dust infiltration.
Move Remaining Items
Do a final check for any outdoor items, trash cans, or garden hoses in the work area. Clear any barriers between the roof and the dumpster placement area.
Final Power Check
Verify exterior outlets are accessible and functional. Brief the crew on where they can access power and water if needed.
Stay Reachable
Keep your phone accessible in case the crew needs to reach you about access, unexpected issues, or questions about existing damage discovered during tear-off.
FAQ: Your Roof Replacement Preparation Questions
How can I protect my house from damage during a roof replacement?
Roof replacement preparation involves securing your home's interior, clearing exterior work areas, verifying contractor credentials, protecting landscaping, and planning for family and pet safety before installation begins. It includes protecting sensitive electronics and HVAC systems from vibrations and dust, establishing communication protocols with your contractor, and documenting existing property conditions to prevent disputes over accidental damage. Taking photos of your AC condenser unit, garage door, and landscaping is critical—these are the most common areas for accidental debris strikes and contractor disputes.
Should I stay home during roof replacement?
Most homeowners can stay home, but it's not pleasant—the noise and vibration are significant. If you work from home, arrange to work elsewhere. If you have young children or anxious pets, making alternative arrangements reduces stress considerably. If you do stay home, prepare to be less productive than usual and keep family members away from work areas.
How long does a typical roof replacement take?
A standard roof replacement typically takes 1-3 days depending on your roof's size and complexity. Most contractors can complete an average residential roof in one to two days. Weather, underlying damage, or additional repairs discovered during tear-off can extend the timeline.
What damage might a contractor discover under my old roof?
Hidden damage often surfaces during tear-off when roofers remove old shingles and examine the deck. Your contractor should stop work, photograph the damage, explain the issue to you, and provide options and pricing for repairs. Common discoveries include rotted roof decking or delaminated plywood—damage typically caused by poor ventilation, inadequate flashing, or years of moisture infiltration. This is why ongoing communication during the project matters—you can make informed decisions quickly rather than discovering surprises after completion.
How do I ensure no roofing nails are left in my grass after installation?
Professional roofing contractors include thorough cleanup as part of the job. They'll use magnetic nail sweepers, vacuum debris from gutters, and typically perform cleanup twice—once mid-project and again after completion. The most effective protection is asking your contractor to perform a "double magnet sweep" of your yard to collect barbed roofing nails that are nearly invisible in grass and landscaping. This is especially important if you have children or pets who could step on nails. Request this secondary sweep in your contract to ensure it happens.

What should I ask about warranty coverage?
Ask your contractor for a written explanation of both the manufacturer's warranty (covering material defects) and the contractor's workmanship warranty (covering installation). Ask what's covered, what's excluded, how to file a claim if needed, and what maintenance is required to maintain coverage. Proper ventilation and regular inspections often factor into warranty coverage.
Your Roof Replacement Preparation Checklist: Quick Reference
Before Contractor Arrives:
- Verify contractor licensing, bonding, insurance, and certifications
- Confirm workmanship warranty of 10+ years in writing
- Secure written estimate and project timeline
- Schedule pre-project walk-through with project manager
Interior Preparation:
- Remove or secure wall hangings and decorations
- Cover attic items and insulation with tarps
- Place drop cloths on attic flooring
Exterior Preparation:
- Move vehicles to off-site location
- Move outdoor furniture, grills, and potted plants 10-15 feet away
- Trim overhanging tree branches
- Cut grass 1-2 days before project
- Mark sprinkler heads with orange flags
- Notify neighbors of project dates
Family, Pets, and Logistics:
- Arrange pet boarding or indoor care
- Plan childcare or activities for young children
- Discuss work schedule and communication with contractor
- Take before photos of property and existing conditions
Final Verification:
- Confirm permits are pulled and current
- Verify contractor has liability insurance and workers' comp
- Identify power sources and utility locations
- Confirm cleanup expectations in writing

Your Partner in Northeast Ohio Roof Protection
Roof replacement preparation determines whether your new roof provides decades of protection or becomes a source of regret. Choosing a certified, experienced contractor with strong warranties, combined with thoughtful home preparation, transforms a potentially overwhelming project into a manageable process.
TK Roofing & Gutters brings 20+ years of Northeast Ohio roofing expertise to every replacement project. As a GAF Certified Plus contractor, CertainTeed Select ShingleMaster™ certified, and Owens Corning certified installer, we install roofs that withstand freeze-thaw cycles, heavy snow, and severe storms—the realities of Akron, Canton, and Massillon roofing. Our 10-year workmanship warranty means we stand behind every installation.
More importantly, our TK Promise commits to thorough inspections, clear explanations, property protection, and meticulous cleanup—including a double magnet sweep of your yard to remove nails. Homeowners trust us because we treat their homes like our own.
Ready to prepare for your roof replacement? Contact TK Roofing & Gutters for a free inspection and estimate. We'll answer your questions, explain what to expect, and guide you through every preparation step. Your peace of mind during the project matters to us—let's make your roof replacement a smooth, professional experience.
Call (330) 858-2616 for your free roof inspection and estimate.
Call Us
(330) 858-2616Email Us
info@tkroofingandgutters.comVisit Our Office
3256 South Main St. Akron, Ohio 44319
Hours
9am - 5pm
Monday to Friday
Closed Holidays
Monday to Friday
Closed Holidays
Related Posts
 My Roof Is 15 Years Old and I Have One Leak: Repair or Replace?
A single leak at 15 years usually traces to failed flashing, not a dying roof. Here is how Akron homeowners can tell repair from replacement with confidence.
Read Article
 What Is the 50% Rule for Roof Replacement?
The 50% rule says replace your roof when repair costs exceed half of replacement value. Learn what it is, what it is not and how to apply it in Northeast Ohio.
Read Article
Search
